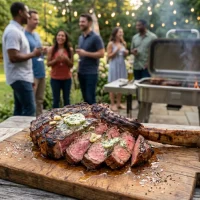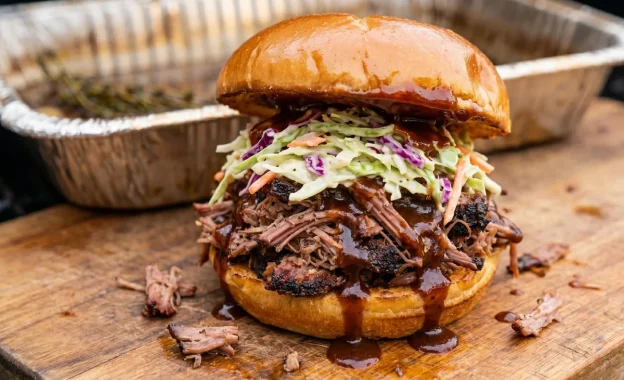
There’s something truly magical about transforming a tough, humble cut of meat into a masterpiece of tender, juicy flavor. If you’ve been looking for the ultimate crowd-pleaser, this smoked beef chuck roast for “pulled beef” sandwiches is going to be your new weekend obsession. Imagine deep, smoky bark giving way to melt-in-your-mouth strands of savory beef, piled high on a toasted bun and dripping with your favorite barbecue sauce. It’s the kind of bite that makes you close your eyes and savor every single second.
Often affectionately known in the barbecue community as “poor man’s brisket,” a slow-smoked beef chuck roast offers all the rich, beefy flavor and glorious rendered fat of a brisket, but in a fraction of the time and at a much more approachable price point. Whether you’re a seasoned pitmaster or a beginner firing up the smoker for the first time, this method is practically foolproof and guarantees incredibly succulent results.
Get ready to master this smoked chuck roast recipe! With a simple rub, a steady fire, and a little bit of patience, you’ll be serving up the best BBQ pulled beef sandwiches your family and friends have ever tasted. Let’s get smoking!
Difficulty: Medium Total Time: 9 hours Active Time: 30 minutes Yield: 8–10 servings
Why You’ll Love This Recipe
- Incredible Value: Chuck roast is budget-friendly but delivers premium, steak-house quality flavor when slow-cooked.
- Forgiving Technique: Unlike brisket, chuck roast is highly marbled and very forgiving, meaning it won’t easily dry out if your smoker temperature fluctuates a bit.
- Crowd-Pleaser: One 3–4 pound roast yields enough pulled beef to feed a hungry group, making it perfect for game days, family reunions, or summer cookouts.
- Freezer-Friendly: Leftover pulled beef freezes beautifully, giving you an easy head start on weeknight dinners like tacos or loaded baked potatoes.
Required Equipment
- A smoker (pellet, offset, kamado, or electric)
- Meat thermometer (a probe style is best for constant monitoring)
- Heavy-duty aluminum foil or peach butcher paper
- Disposable aluminum pan (half-size deep pan)
- Spritz bottle
- Meat shredding claws or two sturdy forks
Ingredients
For the Beef
- 1 Beef Chuck Roast (3.5 to 4 lbs, look for heavy white marbling)
- 2 tbsp Olive oil or yellow mustard (as a binder)
- 1/4 cup Coarse kosher salt
- 1/4 cup Coarse black pepper (16-mesh if you have it)
- 1 tbsp Garlic powder
- 1/2 cup Beef broth or apple juice (for spritzing)
For the Braise
- 1 cup Beef broth
- 1/2 cup Stout beer or Dr. Pepper (adds incredible depth of flavor)
- 1/2 cup BBQ sauce (your favorite brand)
- 2 tbsp Butter (cut into small pats)
For Serving
- 8-10 Brioche or potato buns
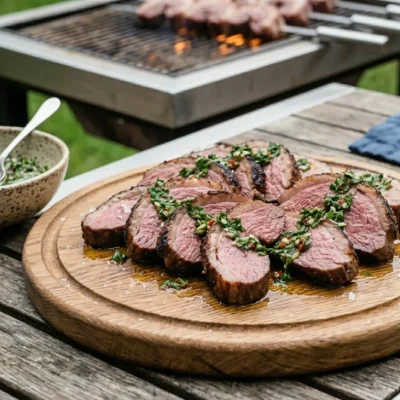
- Coleslaw (optional, but highly recommended for crunch and acidity)
- Extra BBQ sauce
- Pickles or jalapeños
Step-by-Step Instructions
Step 1: Prep and Seasoning
- Preheat your smoker to 250°F (120°C). Use hickory, oak, or pecan wood for the best robust beef flavor.
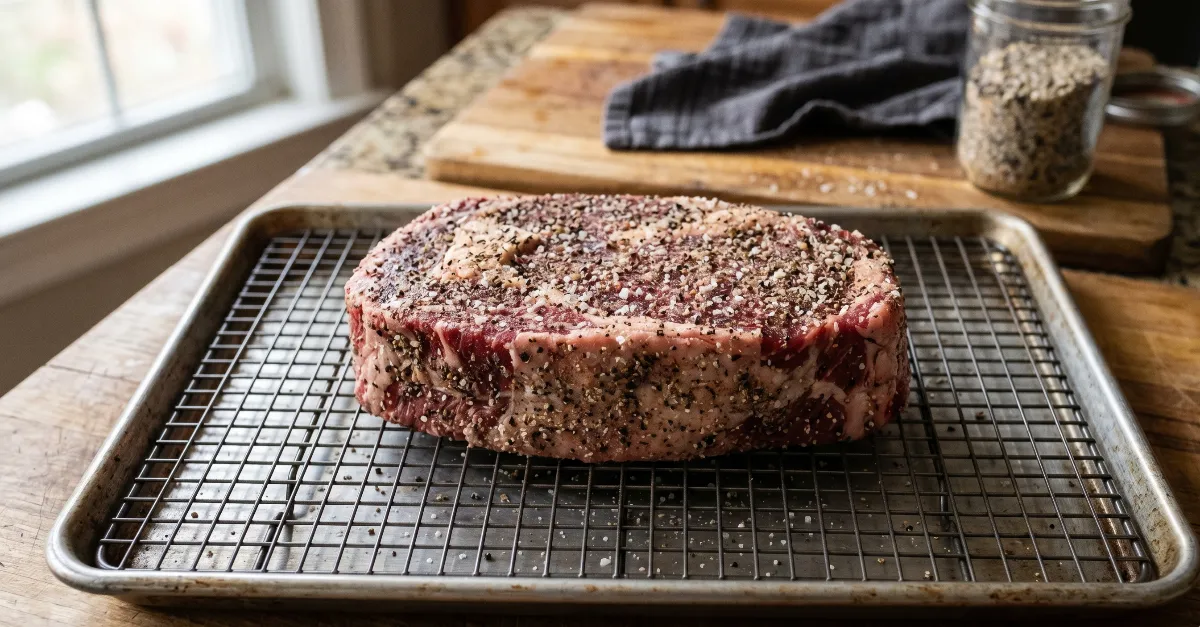
- Trim the chuck roast by removing any large, hard pieces of surface fat or silver skin. Leave the internal marbling alone, as that will melt and keep the meat moist!
- Apply the binder by rubbing a thin layer of olive oil or mustard all over the meat. This gives the spices something to stick to.
- Mix the rub by combining the salt, black pepper, and garlic powder in a small bowl.
- Season the meat generously on all sides, patting the rub into the meat rather than rubbing it, to ensure an even, beautiful crust.
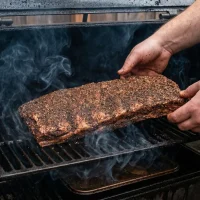
Step 2: The Smoke
- Place the roast on the smoker directly on the grates.
- Smoke the meat undisturbed for the first 2 hours to allow the bark to form and the smoke flavor to adhere.
- Spritz the roast lightly with beef broth or apple juice every 45 minutes after the 2-hour mark to keep the surface moist and attract more smoke.

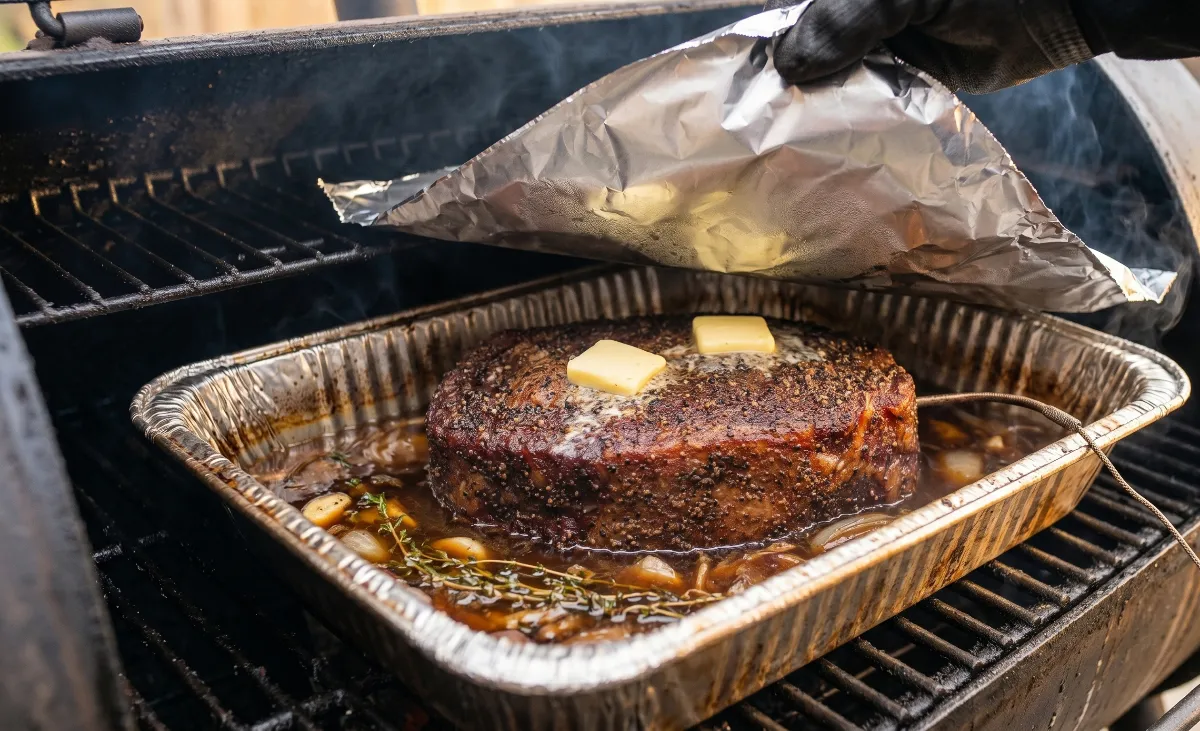
Step 3: The Braise (The “Texas Crutch”)
- Monitor the internal temperature until it reaches roughly 165°F to 170°F (74°C–76°C) and the bark has set (it shouldn’t wipe away when you touch it). This usually takes about 4–5 hours.
- Transfer the roast into a disposable aluminum pan.
- Add the braising liquids by pouring the beef broth, stout beer (or Dr. Pepper), and BBQ sauce into the pan around the meat. Place the pats of butter on top of the roast.
- Seal the pan tightly with heavy-duty aluminum foil to trap the steam and moisture.
Step 4: Shredding and Serving
- Return the pan to the smoker (or an indoor oven set to 250°F) and continue cooking.
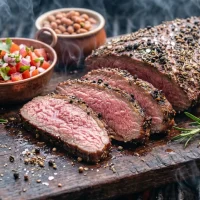
- Check for tenderness when the internal temperature hits around 205°F (96°C). The thermometer probe should slide into the meat with zero resistance, like room-temperature butter. This usually takes another 3–4 hours.
- Rest the meat by taking it off the heat and leaving the pan covered on your counter for 45 minutes to an hour. This allows the boiling juices to settle and redistribute.
- Shred the beef using meat claws or two forks right in the pan, mixing it thoroughly with the reduced braising liquid.
- Assemble the sandwiches by piling the juicy pulled beef onto toasted brioche buns and topping with slaw, pickles, and extra BBQ sauce.

Chef’s Tips
- Don’t Rush the Rest: Resting the meat is non-negotiable. If you shred it while it’s boiling hot, the steam will escape, leaving you with dry beef. Let it rest!
- Feel, Don’t Just Temp: Every cut of meat is different. While 205°F is a great target, the true test is the “probe test.” If it feels tough when you insert the thermometer, keep cooking until it yields easily.
- Toast the Buns: Juicy, saucy meat requires a sturdy foundation. Brushing your buns with butter and toasting them prevents them from getting soggy and falling apart in your hands.
Variations & Adaptations
- Spicy Tex-Mex: Swap the BBQ sauce and beer in the braise for a can of chipotles in adobo and extra beef broth to make incredible shredded beef for tacos, nachos, or enchiladas.
- Oven Method: Don’t have a smoker? You can achieve great results by heavily seasoning the roast, searing it in a cast-iron skillet on the stove, and braising it covered in a 250°F oven for 4–5 hours until tender. You’ll miss the smoke ring, but the flavor will still be amazing.
- Sweet and Sticky Bark: Add a quarter cup of dark brown sugar or a drizzle of honey to the rub for a sweeter bark that caramelizes beautifully.
Serving & Storage
Serving: Serve these sandwiches alongside classic BBQ sides like smoked mac and cheese, tangy potato salad, creamy coleslaw, or sweet baked beans.
Storage: Store leftover pulled beef in an airtight container in the fridge for up to 4 days. To freeze, let it cool completely, place it in a freezer-safe zip-top bag with plenty of the pan juices, and freeze for up to 3 months. Thaw overnight in the fridge and reheat gently in a saucepan over medium-low heat.
FAQ
Why is my smoked chuck roast tough?
A tough chuck roast almost always means it was undercooked. Chuck is full of tight connective tissue that needs time and heat to break down into gelatin. If it’s tough or chewy, cover it back up and keep cooking until it shreds easily.
Can I wrap the chuck roast in butcher paper instead of using an aluminum pan?
Absolutely! Wrapping in peach butcher paper will preserve a crustier bark. However, using the aluminum pan method captures all the incredible rendered fat and braising juices, which you can mix back into the meat to keep the shredded beef incredibly moist.
What type of wood is best for smoking beef?
Beef is a hearty meat that can stand up to heavy smoke profiles. Hickory, oak, and mesquite are excellent choices that provide a robust flavor. If you prefer a milder, sweeter smoke, try pecan or cherry wood.
What type of wood is best for smoking beef?
Beef is a hearty meat that can stand up to heavy smoke profiles. Hickory, oak, and mesquite are excellent choices that provide a robust flavor. If you prefer a milder, sweeter smoke, try pecan or cherry wood.
How long does it take to smoke a chuck roast per pound?
As a general rule, plan for about 1.5 to 2 hours per pound at 250°F (120°C). However, barbecue is done to temperature and feel, not strictly by time. Always rely on your meat thermometer rather than the clock, as variations in meat thickness, fat content, and your specific smoker will alter the cook time.
Can I make this a day ahead of time?
Yes! In fact, many people think smoked meats taste even better the next day after the flavors have had time to meld in the fridge. Smoke and shred the beef as directed, let it cool, and store it in an airtight container with all its juices. Reheat it gently in a slow cooker on low, or in a covered pan in the oven at 300°F (150°C) until warm.
Do I need to inject the chuck roast before smoking?
No, injecting is not strictly necessary for a chuck roast. Because chuck is naturally well-marbled with fat, it will stay incredibly moist during the slow-cooking and braising process. However, if you want an extra layer of internal flavor, injecting it with beef tallow or a mixture of beef broth and Worcestershire sauce certainly won’t hurt!
What do I do if the internal temperature stalls?
The “stall” happens when the meat’s internal temperature gets stuck (usually around 160°F to 170°F) due to evaporative cooling. Don’t panic and don’t crank up the heat. Simply proceed to Step 3 (The Braise). Placing the meat in the covered aluminum pan traps the moisture, essentially powering right through the stall and speeding up the final phase of the cook.
Ready to get cooking? Fire up that smoker and give this recipe a try this weekend! If you make these ultimate pulled beef sandwiches, drop a comment below and let us know how they turned out. Don’t forget to tag @BrickHouseGrille on social media with your BBQ masterpiece!